Android recently started advising developers to use Gradle as their build system for new projects. I don’t really keep up-to-date on the Java ecosystem – and I prefer working in dynamic languages – so I didn’t even really know what a “build system” constituted. All I could think about was nightmares from writing Makefiles in my freshmen engineering classes (and everything going horribly wrong).
One of the aspects of a build system that Gradle can handle is managing your external dependencies. You can think of it like Ruby’s Bundler – you can specify the version of a JAR file (the Java equivalent of a Ruby gem) and then Gradle can automatically download and install the library (usually from a RubyGems-like source called Maven Central).
I couldn’t find any singular resource that covered the whole process of what I wanted to achieve: using a library I found on GitHub in my own Android project. And you probably know how hard to grok anything Java-related is (just try to understand this, I dare you!), so I have documented the steps here. It is actually pretty easy and well thought-out once you know how it works.
First, find the library you want to add – in my case it was Square’s Retrofit library. I wanted to use the latest version (1.2.2 at the time of this writing) but I ran into an issue. Retrofit is setup to use Maven (a different build tool) so the installation instructions weren’t quite what I needed. The important part is to identify the Group ID, Artifact ID, and Version (“com.square.retrofit”, “retrofit”, and “1.2.2” respectively in my case)
In your Android project (I am using Android Studio), find the build.gradle file. You should see a section with a block labeled “dependencies”. This is where we need to add a line to tell Gradle to install the library. We add a “compile” command and pass it the library argument – using a special format. The format is group_id:artifact_id:version. So in our example,
dependencies { compile ‘com.squareup.retrofit:retrofit:1.2.2’ }
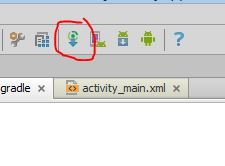
The last step is to hit the “Sync Project with Gradle Files” button in Android Studio. This is the magic button that will trigger Gradle to go download the JAR files and do the behind-the-scenes work to hook up the library into your Android project (I tried to find out what commands it actually runs, but could not – leave a comment if you know!).
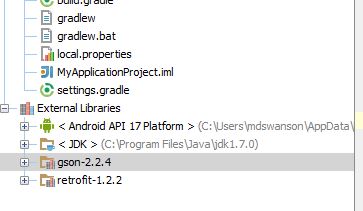
If all goes well, your IDE should start churning and you should see your freshly downloaded JAR file under External Libraries in the Project view and you can start using it in your project!
One extra benefit is that I don’t have to check the JARs (binary files) into source control. We let the source control manage our source code, we let the build system manage our dependencies. A place for everything and everything in its place!
There is a lot more to Gradle than just dependency management, but this is as far as I’ve dug thus far. It worked surprisingly well and was not too different from Ruby’s dependency process.
