Microsoft has withdrawn support for the Windows XP operating system, but if you are like me, we still have systems running under this operating system that need to be monitored and maintained. Many people have opted for creating virtual machines with these legacy environments (backed by virtual hard disks (VHDs)), to make them more portable as their main operating systems are upgraded to the latest and greatest. Up to Windows 7, it was easy to connect to a legacy virtual hard disk using Virtual PC. In Windows 8, Microsoft replaced Virtual PC with Hyper-V. It is a little trickier to get a VHD loaded into a Hyper V virtual machine (VM). Here are the steps to port an existing virtual hard disk to Windows 8.
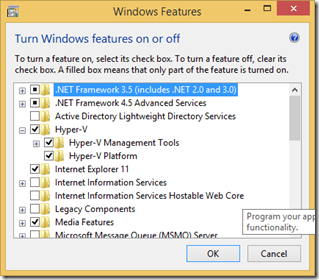
- Enable Hyper-V on Windows 8 if disabled.
You can do this by searching for ‘Windows Features’, selecting ‘Turn Windows features on or off’ from the displayed list, and choosing the Setting option.
Select Hyper-V, and then ‘OK’ to install the client Hyper-V.
- Allow for connection of the VM to a network.
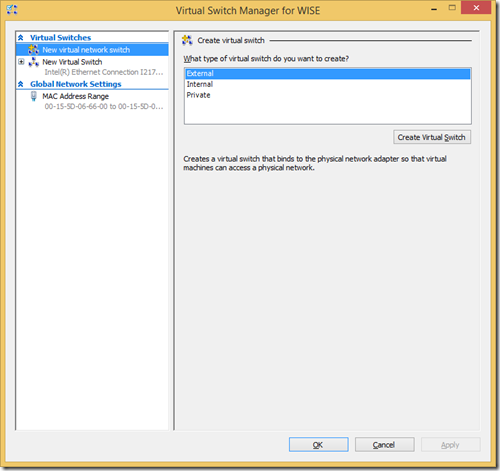
If you need to connect to a network (and the internet) from the virtual machine, you will need to add a new virtual network switch in Hyper-V. Open Hyper-V Manager and click ‘Virtual Switch Manager…’ from the right Actions pane. Create a new external virtual switch so that the virtual machine can access the host machine and the internet.
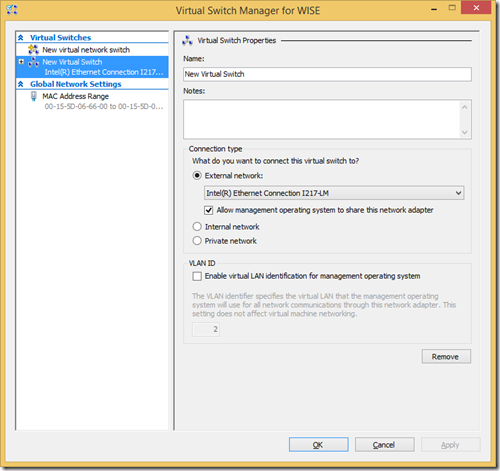
After creating the switch, select the External network connection type, choose the host network adapter, and check the option to allow the host and virtual machine to share the same network adapter (see below). Click OK to save the changes.
3. Create the VM.
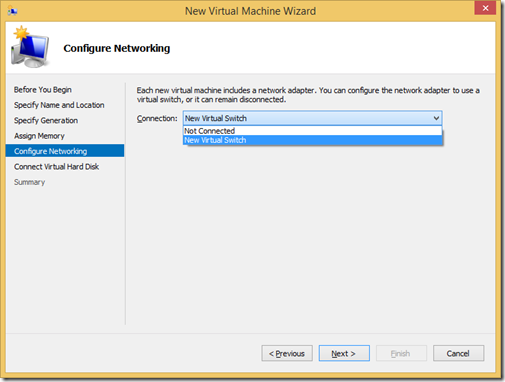
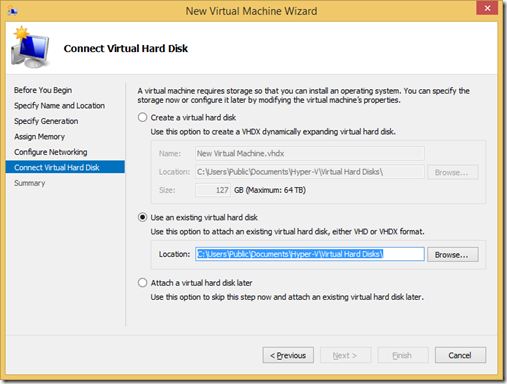
Open Hyper-V Manager and create a new virtual machine using ‘New > Virtual machine’ from the right Actions pane. Specify the name and location for the virtual machine, select ‘Generation 1’ for the virtual hardware to use, assign the required memory, and select the virtual switch just created for the network configuration (see below).
Finally, in order to use an existing hard disk (VHD), select this option, and provide the path to the VHD.
- Enable mouse capture in the VM.
When the newly created virtual machine is started, you may find that the mouse is not usable (captured) inside the VM. In order to enable mouse capture in the VM, you will need to uninstall Virtual Machine Additions from the virtual machine (if installed when the VM was used with Virtual PC), and install System Integration Services. This can be a bit tricky when all you have to work with in the VM is the keyboard. The Windows logo key can be used to access the Start menu, and then with the help of tab, the arrow keys, and Enter, you can access the Control Panel, ‘Add or Remove Programs’ tool. With tab and the down arrow key, navigate to ‘Virtual Machine Additions’, and once again using the tab key, navigate to the Remove button, and hit Enter to uninstall the additions from the VM.
To install the System Integration Services, in the Virtual Machine Connection window, click ‘Action | Insert Integration Services Setup Disk’. This should load the disk in the VM’s file system, and start the setup. If the setup does not start automatically, use the Windows logo key to bring up the Start menu, navigate to ‘Run…’, and hit Enter to bring up the run dialog. Type explorer in the displayed test field, and hit Enter. This will display Windows Explorer, allowing you can navigate to the Integration Services Setup disk and run setup.exe (usually in the x86 folder). Once the services are installed (the VM may restart to complete the installation), you will be able to use the mouse in the VM.
- Restore the new VM to the Active Directory domain.
If the VM was on an Active Directory domain before the move to Windows 8, the domain controller will still have an entry for the old VM, so that you will not be able to log in to the new VM when on the network. You will probably be greeted with the following error “Windows cannot connect to the domain, either because the domain controller is down or otherwise unavailable, or because your computer account was not found. Please try again later. If this message continues to appear, contact your system administrator for assistance.” In order to fix this error, you will need to contact your network administrator and remove the old VM from Active Directory. After that, you will need to add the new VM to the domain by following the steps outlined below:
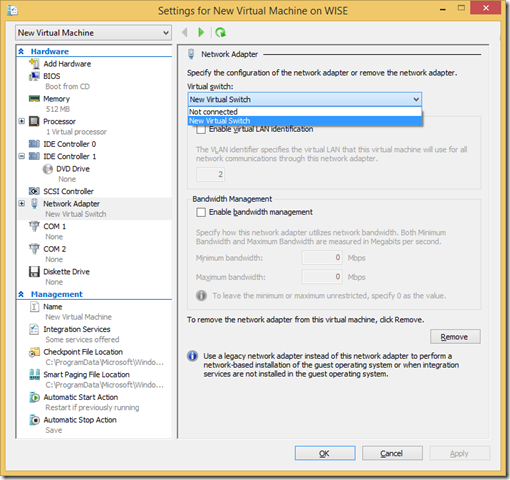
a. If you already have a local administrator account on the VM, skip to the next step. Otherwise, remove the virtual switch from the VM by changing the network adapter setting to ‘Not connected’ (see below)
Log in using your cached domain credentials, which should work if you have logged in successfully with the old VM on the network. Create a local administrator account, and log out. Restore the network adapter to the virtual switch in the VM Settings.
b. Log in using the local administrator account. Open the System Properties dialog by right-clicking on ‘My Computer’ from the Start menu, and selecting ‘Properties’. On the Computer Name tab, click ‘Change…’ to remove the computer from the domain. Once the dialog displays, note down the domain name in the Domain text box, click the Workgroup option, and enter any name for the Workgroup. You will be asked to enter the administrator credentials. After entering the credentials, click OK to save the changes, and exit the System Properties dialog. You may need to restart the computer.
c. Log back in as the local administrator. Open the System Properties once again, click on the Computer Name tab, and click ‘Change…’. Select the Domain option, and enter the name of the domain noted in step b. You will need to enter the administrator credentials once again to confirm the changes. Click OK, exit the System Properties dialog, and restart the computer.
You should now be able to log in as the domain user, to access all network resources and the internet.
Build awesome things for fun.
Check out our current openings for your chance to make awesome things with creative, curious people.
You Might Also Like
