Check Out Automated Testing for CloudFormation Templates That’s Not Boring

tCloudFormation is a powerful tool that allows you to define your AWS infrastructure as code. And like any piece of software, testing is an important part of the software development lifecycle. This is especially important when practicing continuous delivery or continuous deployment. In this post, I present a working example of a CI/CD pipeline for a basic CloudFormation template and highlight the testing tools utilized.
Walk Through a Working Example
In order to focus the example on the testing tools themselves, the CloudFormation template itself is pretty boring as it only creates a single S3 bucket. I have also chosen to build out the CI/CD pipeline using CodePipeline and CodeBuild so that you can quickly deploy the same pipeline to your AWS account. The source code for the example pipeline is here:
https://github.com/JasonAGiles/aws-cloudformation-pipeline-example
Fork the Example Repository
Simply cloning the example repository won’t work since your personal access token that you will generate later won’t be able to setup a webhook for the example repository under my username. You will however be able to set one up for your forked repository. Create your own fork of the following repository here:
https://github.com/JasonAGiles/aws-cloudformation-pipeline-example/fork
Once you have forked the repository, clone it onto your local machine.
Directory Structure
The directory structure of the repository is as follows:
├── buildspec.yml├── ci│ ├── input.json│ └── taskcat.yml├── pipeline│ └── pipeline.template└── templates └── workload.templateThe ci folder contains the template inputs and configuration for a tool called taskcat which I will discuss in more detail later. Next, the pipeline folder contains the CloudFormation template that defines the CI/CD pipeline in CodePipeline. Then, the templates folder contains the CloudFormation template that defines the workload for which we are setting up the pipeline. And the buildspec.yml file defines the steps taken by CodeBuild in order to test the workload template before deploying it to production.
Create Personal Access Token
In order to successfully deploy the pipeline, you will need to generate a personal access token that will have access to clone and setup webhooks for the repository. The following link will do the heavy lifting for you:
Optional: Use Secrets Manager for Personal Access Token
While not necessary, it is generally considered best practice to hold sensitive values (especially credentials) in a secure location like an encrypted parameter in Parameter Store or as a secret in Secrets Manager. Since these both support encryption with KMS keys, you have enhanced control over who has access to decrypt these values as well as CloudTrail logging when the keys are used. If you choose to import your personal access token into Secrets Manager, you can use a dynamic reference as the value for the GitHubPersonalAccessToken parameter so that the value is pulled from Secrets Manager instead of being directly passed to CloudFormation as plain text.
- Navigate to the AWS Secrets Manager console and click the Store a new secret button.
- For secret type, select Other type of secrets. Under the Specify the key/value pairs to be stored in this secret, choose the Plaintext tab and paste your personal access token into the text area. Finally, select a KMS key to encrypt the secret (the default key of
aws/secretsmanageris sufficient). Click Next to proceed to the next step.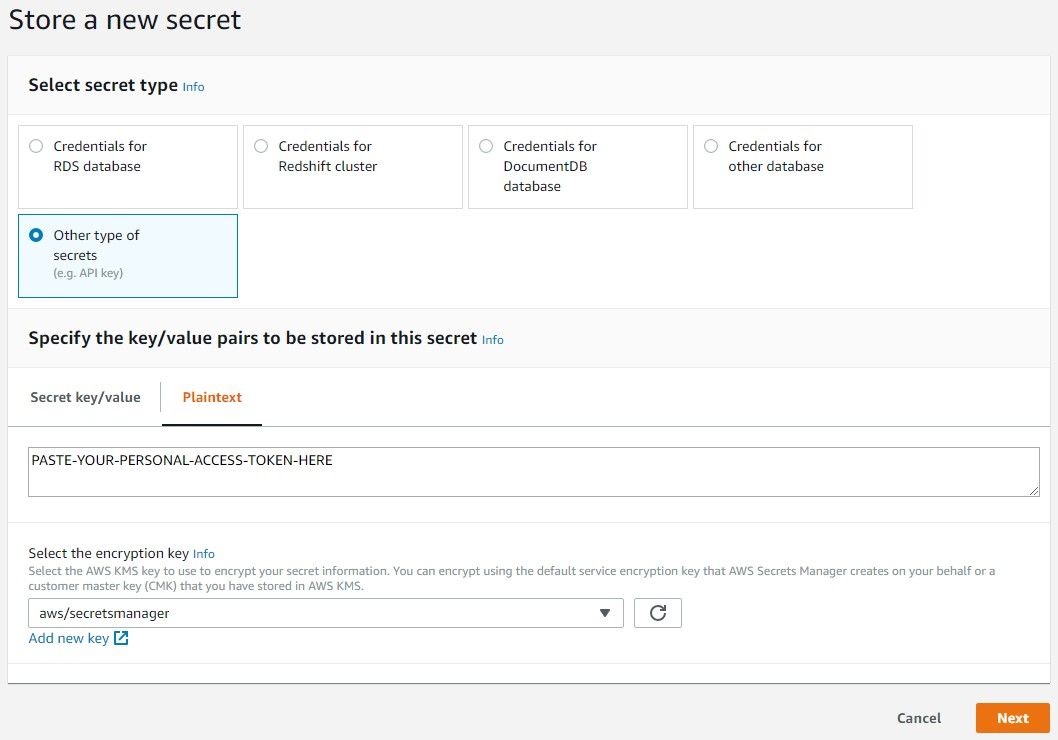
- Enter a secret name, such as
github/personal-access-token, and click Next. - Select the radio button for Disable automatic rotation, and click Next.
- On the review step, ensure the values provided are as intended and click Store.
Now that you’re storing a personal access token in Secrets Manager, you can pass it to CloudFormation using the following value for the GitHubPersonalAccessToken parameter:
{{resolve:secretsmanager:github/personal-access-token:SecretString}}Note: Make sure you use the same name provided when you created the secret. In this example, we use the value:
github/personal-access-token.
Deploy Pipeline Stack
Now you have everything you need to deploy the example pipeline to AWS. This pipeline will have three stages, Source, Test, and Deploy. Simply put, this pipeline will clone the repository containing our CloudFormation template, run various tests on the workload template, and ultimately deploy it to production.
- Navigate to the AWS CloudFormation console and click the Create Stack button.
- Choose the Upload a template file option and choose the template file located at
pipeline/pipeline.templatefrom your cloned repository. Once selected, click Next. - On the Specify Stack Details step, enter a value for your stack name and values for the various parameters and click Next. The parameter values should be as follows:
Parameter Value GitHubRepositoryOwner your-github-usernameGitHubRepositoryName aws-cloudformation-pipeline-exampleoryour-renamed-fork-repositoryGitHubIntegrationBranch masterGitHubPersonalAccessToken {{resolve:secretsmanager:github/personal-access-token:SecretString}}oryour-personal-access-tokenDeploymentStackName your-production-stack-namePassGitHubPersonalAccessTokenToCodeBuild true(see note)Note: While
trueis strongly recommended for the PassGitHubPersonalAccessTokenToCodeBuild parameter, you might have issues deploying this stack if you have previously worked with CodeBuild and have already granted CodeBuild permissions to your GitHub account. If that is the case, set this parameter tofalseand redeploy. - Click Next on the Configure Stack Options step.
- On the Review step, you will need to scroll to the bottom of the page and check the checkbox acknowledging that the stack will create IAM resources. Afterwards, click Create Stack.
Once the stack reaches a status of CREATE_COMPLETE, you should see the pipeline run in the CodePipeline console. If everything goes accordingly, the results of executing your pipeline should look something like this:
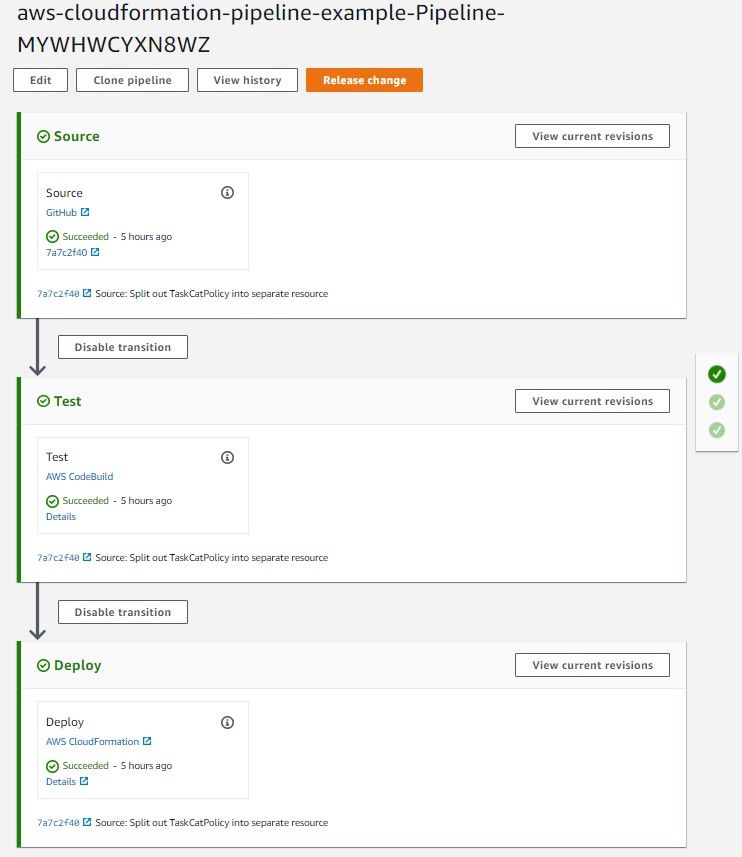
The Details link for the Test stage of the pipeline will direct you to the CodeBuild output for the executed tests. This link will be helpful in debugging cases where the tests fail and prevent a deployment from occurring.
The Details link in the Deploy stage of the pipeline will direct you to the CloudFormation console where more information can found about the deployment of the production stack.
Testing Tools
Now that you have a working pipeline running in your own AWS account (or you are lazy like me, and just care about the testing tools themselves) I wanted to go through the different tests being defined in the buildspec.yml file and run as part of the pipeline.
ValidateTemplate
This is the most basic test you can run on a CloudFormation template. ValidateTemplate is an action available on the CloudFormation API and will determine if the file provided is a valid JSON/YAML CloudFormation template. Call the command locally using the AWS CLI and does require authentication against an AWS account in order to work successfully.
Test Command:
aws cloudformation validate-template --template-body file://templates/workload.templateDocumentation:
https://docs.aws.amazon.com/AWSCloudFormation/latest/APIReference/API_ValidateTemplate.html
yamllint
Linting isn’t necessarily a testing tool, but it is a great tool that allows for keeping code formatted in a clean consistent way. Having a tool like this run on every commit eliminates limits the number of code review comments related to style. It allows developers to focus in on the substance of the change instead of the style. yamllint is available as a Python module and supports configuring of rules from a configuration file. It also allows disabling checks via comments.
Test Command:
yamllint --strict templates/workload.templateDocumentation:
https://yamllint.readthedocs.io/en/stable/configuration.html
cfn-lint
Another linter, but this one goes beyond basic style checking. The CloudFormation Linter is an open-source project currently maintained by the CloudFormation team and has been around since April 2018. It aims to check your CloudFormation template against the CloudFormation specification. Additionally, it will detect things like incorrect values for resource properties as well as looking for unused parameters. It also supports some basic customization that allows you to tweak the rules to meet the specific needs of your project. Similar to yamllint, this tool is available as a Python module.
Test Command:
cfn-lint --include-checks I --template templates/workload.templateDocumentation:
https://github.com/aws-cloudformation/cfn-python-lint
cfn-nag
Yet another linting tool, but this one looks at your template to ensure best practices are being followed. cfn-nag will find things like wildcards in IAM policies or S3 buckets that don’t have encryption enabled by default. This open-source project is maintained by stelligent, made available as a Ruby gem and a Docker image.
Test Command:
cfn_nag --fail-on-warnings --output-format txt templates/workload.templateDocumentation:
https://github.com/stelligent/cfn_nag
taskcat
Another linting tool (just kidding). taskcat allows for testing your CloudFormation templates by performing test deployments in multiple regions and providing the results for each deployment. The tool can be configured to run multiple different test scenarios with different input parameters to fully exercise your templates. It also has the ability to generate values for your parameters that helps eliminiate some sticky parameters in your template that have to be globally unique (e.g. BucketName). taskcat is another open-source tool maintained by the folks at AWS and is available as a Python module and a Docker image.
Note: In my experience, this tool doesn’t work on Windows, so I would highly recommend using the Docker image if that is your development operating system of choice.
Test Command:
taskcat -c ci/taskcat.yml | sed "s,\x1B\[[0-9;]*[a-zA-Z],,g"TASKCAT_RESULT=${PIPESTATUS[0]}ls -1 taskcat_outputs/*.txt | while read LOGdo echo echo "> $LOG" cat ${LOG}doneexit $TASKCAT_RESULTI know this one looks a bit scary, so let’s break it down. Unfortunately running taskcat on CodeBuild has two flaws (color escape codes, and not printing logs to STDOUT). The command(s) here will run taskcat and strip the color escape codes from the output. It then saves off the exit code from taskcat to TASKCAT_RESULT. Next, it will loop over all of the log files in the taskcat_outputs/ folder and will print the filename and the contents of the file to STDOUT. Finally, it will exit with the exit code from taskcat so that the test stage will fail, stopping a deployment to production, if an error is discovered.
Documentation:
https://github.com/aws-quickstart/taskcat
Template Highlights
Beyond the testing tools themselves, I wanted to give some additional context and highlight some key areas of the CloudFormation template. Use this information to tweak this pipeline to your own specifications.
Pipeline
The pipeline itself. Arguably the most important resource in the template (it is in the name). This resource controls the steps that are taken, from checkout, to test, and ultimately deploy.
Pipeline: Type: AWS::CodePipeline::Pipeline Properties: ... Stages: - Name: Source ... - Name: Test ... - Name: Deploy ...While I won’t go into the details of how to configure each stage, this resource controls the steps of the pipeline and how they are run. The documentation for the Pipeline resource type is a great source of inspiration to determine what all is possible. Additionally, the documentation for the configuration of the various actions is also helpful to figure out what is required for each action within a given stage.
Pipeline Webhook
This is almost a requirement nowadays for a CI/CD tool. By supporting webhooks from GitHub, the pipeline can be triggered as soon as your code is committed to the repository. As a result, changes can work their way through the pipeline as quickly as possible and reduce the time it takes to get a change to production. This resource requires the admin:repo_hook permission for your GitHub personal access token.
PipelineWebhook: Type: AWS::CodePipeline::Webhook Properties: Authentication: GITHUB_HMAC AuthenticationConfiguration: SecretToken: !Sub ${GitHubPersonalAccessToken} RegisterWithThirdParty: true Filters: - JsonPath: $.ref MatchEquals: refs/heads/{Branch} TargetPipeline: !Sub ${Pipeline} TargetAction: Source TargetPipelineVersion: !Sub ${Pipeline.Version}CodeBuild PR Project
I didn’t really cover this previously, but the template also includes a CodeBuild project to run the same buildspec.yml file on pull requests as well. This can give you earlier feedback on the test results before merging the changes into master. CodeBuild reports the status of the tests back to GitHub, so the results of these checks are viewable directly from the pull request without having to log into AWS to determine if the tests are passing or failing.
CodeBuildPRProject: Type: AWS::CodeBuild::Project Properties: ... Name: !Sub ${GitHubRepositoryName}-pull-requests ServiceRole: !Sub ${CodeBuildRole.Arn} Source: GitCloneDepth: 1 Location: !Sub "https://github.com/${GitHubRepositoryOwner}/${GitHubRepositoryName}.git" ReportBuildStatus: true Type: GITHUB Triggers: Webhook: true FilterGroups: - - Type: EVENT Pattern: PULL_REQUEST_CREATED, PULL_REQUEST_UPDATED, PULL_REQUEST_REOPENED ExcludeMatchedPattern: false - Type: BASE_REF Pattern: !Sub ^refs/heads/${GitHubIntegrationBranch}$ ExcludeMatchedPattern: falseCloudFormation Stack Policy
You can’t get through any blog post about AWS without talking about IAM at some point. While most of the roles and policies in this template shouldn’t need to change, the CloudFormationStackPolicy resource definitely will to meet your purposes. The policy defines the permissions granted to CloudFormation when deploying the templates/workload.template to production. It is important to remember that this role will stay attached to the stack and utilized on subsequent updates (unless replaced with a different role). This means the permissions granted to CloudFormation should consider the required permissions to delete the stack. Any time you modify the workload template, make sure to update this policy to include permissions to cover any new resource types or configuration.
CloudFormationStackPolicy: Type: AWS::IAM::ManagedPolicy Properties: PolicyDocument: Version: "2012-10-17" Statement: - Effect: Allow Action: - s3:CreateBucket - s3:DeleteBucket - s3:GetEncryptionConfiguration - s3:PutEncryptionConfiguration - s3:GetBucketAcl - s3:PutBucketAcl - s3:GetBucketLogging - s3:PutBucketLogging Resource: arn:aws:s3:::*Gotchas
Pipeline Deployment
It’s not apparent at first, but changes to the pipeline are not automatically deployed. Once the pipeline has stabilized, that might not be an issue. If you are in the process of tweaking it, it can be somewhat frustrating. This also means that if you need to change the CloudFormationStackPolicy due to changes being made in the workload template, the changes will need to be manually deployed before the pipeline can successfully deploy the workload template with the new changes. Because of this, it might be beneficial to separate changes made to the pipeline from changes made to the CloudFormation stack.
Order Is Important
Somewhat relatedly, when it comes time to clean up these resources, the order is important. As I just mentioned, the pipeline template defines the IAM role that grants CloudFormation the permissions necessary to deploy the production stack. If you delete the pipeline stack before the production stack, the role will also be deleted. This will lead to a failure when deleting the production stack. The role that grants CloudFormation permissions to manage the stack no longer exists. Because of this, make sure you delete the production stack before deleting the pipeline stack when cleaning up resources.
Wrapping Up
I hope I have armed you with additional tools for testing your CloudFormation templates and automating their deployment. Obviously, there is much room for extension of this example (like maybe, building some application code?). Still, it gives the basic structure for building more complex and robust implementations to meet your specific needs.
Taking big ideas sky-high.
Explore our case studies to see how we elevate cloud solutions like never before.
You Might Also Like
